11/5/20

Diamond Art Joy Ornament

This time last year, I was frantically designing Diamond Art holiday crafts. I was contracted to make fifteen projects that would appear in Leisure Arts' Sparkle Holiday book, along with four projects for their Paper Crafting book. I had a ridiculously short turn-around time and I did pretty much nothing except Diamond Art for two weeks in November. It was awesome and I loved the whole experience. Plus, I am really proud of what I designed. 

Leisure Arts bought my actual projects from me. So when my friends at Creative Crafts invited me to participate in the 2020 Christmas Edition, I decided to make a Diamond Art ornament that I can keep and display. I actually like it better than the glass ornament I made for the book. :)


Diamond Art Joy Ornament


Materials:


Steps:

Remove the top from the ornament and fill it with glitter and feathers. Replace the top. 

Use Sharpies to color in the letters JOY while the stickers are still on the sticker sheet. Then, adhere the letters to the ornament. 

Use a small paintbrush to spread the adhesive onto the letter stickers, trying not to get any on the ornament itself. Add tiny dots of adhesive around the edge of the ornament top. Wait 15 minutes, or until the adhesive becomes clear. 


Time for dotting! Add red dots to the J and the Y and green dots to the O and around the top. Add a loop of ric rac and your ornament is ready to display!

  ---------

If you're looking for more ideas for holiday dotting, I highly recommend Leisure Arts' Sparkle Holiday book. It makes a great gift, too. Here are some of my favorite projects I designed for the book (the ones I most wish I still had and could display in our house):


For even more fun Christmas crafting ideas, check out these ideas!
11/4/20

Evacucation

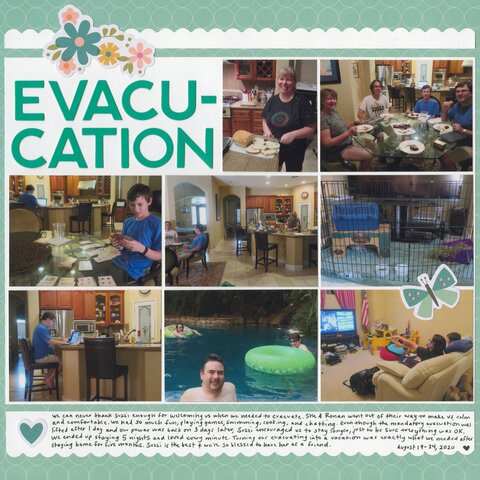
I shared our August evacuation story from the LNU Lightning Complex fire after we returned home. This is the scrapbook version. 

Evacucation (affiliate link)

Actually, this is Part 1 of the scrapbook version. This tells the story of the evacuation-turned-vacation ("evacucation") and what a great time we had with the friends who took us in. I'm planning a second layout that focuses on the actual fire and how close it got to our house. 

I made this layout for the Pensieve: Memories in Review challenge at Victoria Marie Designs. The challenge was to preserve a memory in detail. Most of my layouts do that, as I'm a big fan of using lots of photos and plenty of journaling, but I made this one specifically to meet the challenge. I tried to show (through pictures) and tell (through words) about the emotions as well as the facts. I'm very happy with the finished page. 

11/3/20

Dimensional Pumpkin Thanksgiving Card

Thanksgiving is going to look very different for a lot of people this year. So much has changed since the start of the COVID-19 pandemic. With so many of those changes being negative, I think it's particularly important to focus on the good things in our lives whenever we can. It can be hard to remember at times, but I try my best to be thankful for everything I have and everyone I love.

I made the orange and green papers I used for the pumpkin using this crayon melt technique. In fact, the green pumpkin stem came from the scraps I saved after making my iguana! If you don't want to do crayon melts, then paint the paper or just use colored cardstock. (But crayon melts is the most fun.)


Dimensional Pumpkin Thanksgiving Card


Materials:

  • cardstock (brown, blue, white)
  • papers colored with melted crayon or paint (orange, green)
  • scissors
  • pen
  • foam dots
  • craft glue

Steps: 


Cut a card base from brown paper. Use the scraps to make the piece for the ground and the mat for the sentiment. 

Cut a piece of blue paper just smaller than the card front. Cut a rectangle just smaller than the mat for the sentiment. 

To make the pumpkin, you are going to cut three pieces from the orange-colored paper. The first is a pumpkin that is slightly smaller than the width of the card base. The second piece should be the same height, but narrower on each side to mimic the ribs of a pumpkin. The third piece is leaf-shaped and will be in the foreground. Cut a stem from the green-colored paper. 

Glue the blue card front to the card base, then glue the brown ground piece on top of that. 

Write THANKFUL on the blue rectangle, then glue it to the brown mat. Use foam dots to adhere the sentiment to the top of the card. 

Glue the largest pumpkin piece and the stem to the card front. Use foam dots to adhere the second pumpkin piece to the first, then more foam dots to connect the third pumpkin piece to the second. 

Add a message of gratitude inside and your card is ready to send.

---------

I did a search for THANKFUL on Amazon and found a lot of cool stuff. My favorite find is this shirt, which is so simple and so pretty. I love that it isn't seasonal, just like being thankful is not only for November. It comes in a handful of colors, but I think I like this dark grey the best. 

11/2/20

Panama Canal 2017

Once again, I get to scratch a layout off the top of the need-to-scrap list! With this page about our 2017 cruise through the Panama Canal complete, the oldest story not yet told is from our trip to Ohio in summer of 2018. It's crazy to think that I might actually get caught up with vacation photos before the next time we're able to travel! 

Panama Canal 2017 (affiliate link)

My goal with this page was to include as many photos as possible (39!) and still have space for a lot of journaling. Everything else about the page was inspired by the "Defense of the Dark Arts" challenge during the Yer a Wizard Online Virtual Crop. The layout had to feature dark-colored embellishments, background, and title. I don't normally use a lot of dark elements, so this was definitely a challenge. I don't love how it turned out, but it's fine. I'm definitely glad to have it in the album. 

10/30/20

Halloween Photo Scavenger Hunt

Our county health department has strongly recommended against traditional trick-or-treating, so we won't be hosting friends, going door to door, or passing out candy. One thing we will be doing: a photo scavenger hunt.  


PicMonkey has added a ton of cool graphics to their site, so I challenged myself to spell HALLOWEEN using those graphics in creative ways. Designing this was so much fun! If the scavenger hunt itself is half the fun as making the printable, I'll be thrilled!

While making this, I played around with a bunch of other new features. The instant background remover - *swoon*. I already loved PicMonkey, but it just gets better and better all the time. Hardly a day goes by that I don't use it lately.

Happy Halloween!